Drywall damage has a way of sitting in plain sight for months. Not because it’s acceptable, but because fixing it seems like it should be simple — and everyone has seen a DIY patch job that ended up looking worse than the original damage. The bumpy patch that doesn’t match the texture around it. The outline of a repair showing straight through the paint. The crack that came back three weeks later in exactly the same spot.
The patching itself usually is simple. What takes real skill is the finishing — the joint compound applied in thin coats, the feathering that fades a patch into the surrounding wall, the texture matching that makes it disappear. That’s the difference between a repair nobody notices and one that catches the eye every time someone walks into the room.
Drywall repair is one of the most common calls HomePro Handyman handles, and our technicians bring 10+ years of hands-on experience to every job — from a single nail pop to full panel replacement, new installations, and the taping and mudding that ties it all together.
What Falls in Handyman Scope
The boundary in drywall work comes down to scale and structural complexity, not difficulty. A handful of large jobs belong with a general contractor or a dedicated drywall subcontractor — but almost everything a homeowner or small business actually runs into falls on the handyman side of that line.
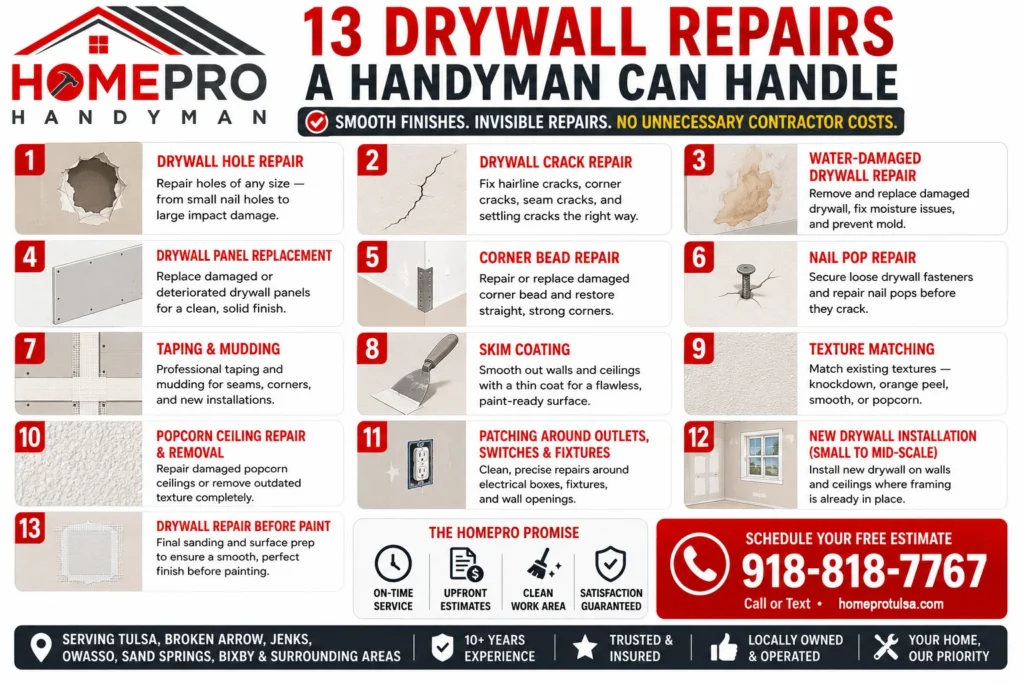
Within handyman scope:
- Repairs of any size, from nail holes to large patches and full panel replacement
- Crack, corner bead, and nail pop repair on walls and ceilings
- Water-damaged drywall removal and replacement
- Texture matching — knockdown, orange peel, smooth, and popcorn
- Popcorn ceiling repair and full removal
- Taping, mudding, skim coating, and paint prep
- Small-to-mid scale new drywall installation where framing is already in place
The work that calls for a contractor is narrower: full new construction, large commercial drywall contracts, and anything requiring structural changes to the framing itself. Everything else is fair game — which covers the vast majority of drywall needs in any home or small commercial space.
1. Drywall Hole Repair
Holes in drywall come from doorknobs, furniture, removed fixtures, plumbing access, and the general wear of daily life. The right repair method depends entirely on the size of the opening, but the standard for the finished result never changes: structurally sound, properly finished, invisible under paint.
Size is what dictates our approach:
- Small holes from nails, screws, and picture hooks get filled with compound, sanded, and primed — the fastest repair on the list.
- Medium holes from doorknobs and minor impacts need backing or a patch installed to give the compound something to grip before finishing.
- Large holes from furniture collisions, removed electrical boxes, or old plumbing cutouts call for a patch panel cut to fit, secured to backing, taped, and built up in multiple coats.
The bigger the hole, the more the repair depends on proper backing and layered joint compound rather than simple filler. A large patch that skips those steps cracks along its edges within a season — which is why our technicians scale the method up with the damage even when the finished surface looks identical.
2. Drywall Crack Repair
Not every wall crack means the same thing, and reading them correctly is half the repair. A hairline crack along a paint line or ceiling junction usually traces back to seasonal movement — wood framing and drywall expanding and contracting through Oklahoma’s swings between humid summers and dry winters. A diagonal crack running from the corner of a window or door more often points to settling. A crack along a taped seam typically means the joint tape underneath has failed and needs to be cut out and redone rather than skimmed over.
That distinction matters because a crack filled without addressing its cause is a crack you’ll repaint every year. Structural cracks that keep returning in the same spot are telling you something. A technician who has repaired hundreds of them can read the pattern, tell you whether it’s cosmetic or a symptom of movement, and flag anything that needs attention before the finish coat goes on — rather than burying the question under a layer of mud.
3. Water-Damaged Drywall Repair
Water and drywall are fundamentally incompatible. Drywall is gypsum pressed between two layers of paper, and once water gets in, the gypsum softens and the paper delaminates. Unlike wood, it doesn’t recover when it dries — the panel is structurally finished, and it has to come out.
The repair starts with finding the true extent of the damage, which almost always reaches further than the stain on the surface suggests. Anything discolored, soft, or bubbling gets removed, and the framing behind it has to be dry before new material goes in. Just as important is resolving the moisture source — a ceiling stain that keeps reappearing isn’t a paint problem, it’s an active leak, and repairing the drywall without fixing the leak just schedules the next repair. Lingering moisture is also how mold gets started inside a wall cavity, which turns a cosmetic fix into a much larger one. Once the area is dry, clean, and sound, new drywall goes in and the finishing sequence begins.
4. Drywall Panel Replacement
Sometimes there’s too much damage to patch. A section that’s taken a large impact, absorbed significant water, or been cut into repeatedly for various repairs reaches a point where replacing the whole panel is cleaner and more reliable than trying to piece it back together. Patching a compromised area produces a repair that looks wrong and often doesn’t hold.
Panel replacement means cutting the damaged drywall back to the nearest studs, hanging new board that matches the existing thickness — typically half-inch for walls, five-eighths for ceilings and fire-rated applications — then taping, mudding, and matching the surrounding texture before priming for paint. Done properly, there’s no visible seam and no change in texture across the repaired area. Nothing about the finished wall says a panel was ever replaced.
5. Drywall Corner Bead Repair
Every outside corner in a drywalled room is finished with corner bead — a metal or paper-faced angle strip that gives the corner a crisp, straight line and shields it from the daily knocks that would otherwise crumble a bare drywall edge. It’s also, predictably, one of the first things to get damaged in a hallway, entryway, or any high-traffic path.
When a corner takes a hit from furniture or a heavy object, the bead underneath usually bends or cracks, and no amount of paint hides it — the damage reads right through the finish. The repair removes the damaged section of bead, sets replacement material to restore a true straight edge, and finishes the joint with compound feathered back into the wall on both sides. The result is a corner that looks factory-straight again rather than patched.
6. Drywall Ceiling Repair
Everything that applies to wall drywall applies overhead too, with one complication that changes the whole job: gravity. Ceiling work takes more setup, more patience, and different technique — joint compound applied to a ceiling finds the floor fast if it isn’t handled correctly. Where panels have started to sag or pull away from the framing above, they have to be resecured or replaced before any finishing happens on the surface.
Ceiling cracks are especially common in older Tulsa-area homes where the original drywall was hung with nails instead of screws. The nail pattern loosens over the years, the panels shift a fraction, and cracks open along the seams. The fix resecures the drywall to the joists, cuts out and replaces the failed tape and compound along the joint, and refinishes to blend with the surrounding ceiling.
7. Popcorn Ceiling Repair
Popcorn texture — the rough, stippled finish sprayed onto millions of ceilings from the 1960s through the 1980s — is brittle, absorbent, and stubborn to repair cleanly. Water stains, impacts, and decades of settling leave sections discolored, crumbling, or partially detached. Faced with that, a lot of homeowners assume the entire ceiling has to come down, when a targeted repair is often the right call.
Popcorn ceiling repair removes the damaged texture, restores the drywall surface beneath it if needed, and reapplies texture blended to the surrounding area. The match won’t be laboratory-perfect — replicating aerosol popcorn texture against an aged ceiling is a matter of getting genuinely close — but a well-executed repair reads as far less noticeable than the damage it replaced, and at a fraction of the cost and mess of full removal.
8. Popcorn Ceiling Removal
For anyone who wants the popcorn gone rather than repaired, removal is a separate and more involved project. The texture is wetted, then scraped from the ceiling section by section — slow, messy work that means masking off and protecting every floor, fixture, and wall in the room first.
One step here is non-negotiable. Popcorn texture applied before the mid-1980s can contain asbestos, and any ceiling from that era needs to be tested before a single scrape — this is a safety requirement, not a formality. Once the texture is off, the drywall underneath is rarely smooth enough to paint as-is, so skim coating or sanding almost always follows. The payoff is a flat, modern ceiling that reads dramatically cleaner than the original and is far easier to repaint and maintain from then on.
9. Drywall Nail Pop Repair
Nail pops are the small round bumps and hairline cracks that surface on walls and ceilings as drywall fasteners work loose and push toward the surface. They show up most in homes built before drywall screws became standard, but newer construction gets them too — usually when framing lumber dried and shrank after the drywall went up, backing the fasteners out.
Fixing a nail pop correctly takes two parts, and the second is the one that gets skipped when it isn’t done professionally. Our technicians drive the popped fastener back below the surface and set a drywall screw an inch or two away to pull the panel tight against the framing — then fill both dimples with joint compound, sand flush, and prime for paint. That added screw is what keeps the pop from returning. Simply tapping the old nail back in and mudding over it means the same spot bumps out again within a season. When it’s done right the first time, it stays put — which is the whole point of paying to have it fixed rather than fighting the same bump every year.
10. Drywall Texture Matching
Texture matching is the single skill that separates an invisible drywall repair from an obvious one. A dead-smooth patch in the middle of a knockdown wall, or a replacement panel finished with the wrong texture depth, jumps out the instant light hits it — paint doesn’t hide a texture mismatch, it highlights it.
Most Tulsa-area homes use one of three wall textures, each with its own application method and its own working window before the compound sets:
- Knockdown — sprayed on, then flattened with a wide knife once it starts to firm up
- Orange peel — sprayed in a finer spatter and left unflattened
- Smooth — no texture at all, which is the least forgiving because every imperfection shows
Popcorn and custom finishes call for a different toolkit entirely. What ties it together is judgment — a technician who has matched hundreds of these can identify a texture on sight and reproduce it closely enough that the repair vanishes, which is the only standard that actually counts.
11. Drywall Taping, Mudding & Surface Preparation
Every drywall repair, whatever its size, ends in the same finishing sequence — and it’s the part that most determines whether the repair disappears or announces itself. Our technicians embed mesh or paper tape over every seam in a first coat of joint compound to bridge the gap and resist cracking, then build two or three progressively wider coats over the tape, each feathered out past the last to blend the repair into the surrounding surface. Sanding between coats knocks down high spots and gives the next layer the flat, clean base it needs to bond, and a final sand, dust removal, and coat of primer brings the area to true paint-ready condition.
The one thing this process can’t survive is being rushed. Skipping a coat or painting before the mud has fully dried gives you a repair that looks fine wet and telegraphs every edge the moment it cures. That’s exactly the failure homeowners run into with a rushed fix — and the reason our technicians treat drywall finishing as a multi-stage job with real drying time between coats rather than a race to a single-day finish on anything bigger than a small patch.
12. Drywall Skim Coating
Skim coating lays a thin, continuous layer of joint compound across an entire wall or ceiling to produce one smooth, uniform surface. It’s the right move in a few specific situations: widespread surface damage, walls left rough after old texture is scraped off, surfaces gone bumpy from too many repaint cycles, or a deliberate conversion from a textured wall to a clean, smooth finish without tearing out the existing drywall.
It’s also a real project rather than a quick pass. Skim coating means multiple full passes across the surface, careful feathering into corners and edges, and methodical sanding between coats. The reward — a wall that reads flat and even from any angle and in any light — is worth the effort, but there’s no shortcut version of it.
13. Drywall Installation for Small Projects
Not all drywall installation is new construction. Plenty of it is exactly the kind of mid-scale project that falls between “too big to call a patch” and “too small to bring in a drywall crew”:
- A converted garage that needs drywall before it becomes a bedroom or office
- A basement being finished one room at a time
- A wall opened up for plumbing or electrical work that now needs to be closed and finished
- A new partition or room divider going into a large open space
In each case the framing is already standing, and what’s needed is someone to hang the panels, tape and mud the joints, match any surrounding texture, and hand back a surface that’s ready for primer. That’s squarely within handyman scope. Where it crosses the line is full-house new construction — dozens of panels hung on a general contractor’s schedule — which belongs with a drywall subcontractor. A two-car garage conversion or a basement build-out is a completely different scale, and precisely the kind of job HomePro is built for.
When You Need a Drywall Contractor
A few situations genuinely fall outside handyman scope: large commercial drywall contracts, full new construction running under a general contractor, and any job that requires permits for structural changes to the framing itself. When a project crosses into that territory, a HomePro technician will say so plainly and help you figure out what kind of professional it actually calls for — rather than taking on work that belongs somewhere else.
What to Expect From HomePro Handyman
Every technician on the HomePro team brings more than a decade of drywall experience. They arrive on time, in uniform, assess the damage honestly before starting, and hand you a written estimate with no hidden charges. Drywall work makes dust — the space gets fully protected before the first cut and thoroughly cleaned before the technician leaves. When it’s finished, your technician walks the completed repair with you in good light before calling it done.
HomePro serves Tulsa, Broken Arrow, Jenks, Owasso, Sand Springs, Bixby, and the surrounding area — for homeowners and small businesses alike.